Battle of Courtrai (1794)
The Battle of Courtrai (10–12 May 1794) saw a Republican French army under Jean-Charles Pichegru oppose Coalition forces commanded by François Sébastien Charles Joseph de Croix, Count of Clerfayt and Prince Frederick, Duke of York and Albany. On 10 May, a French attempt to advance east toward Tournai was turned back by York's troops in the Battle of Willems. During this action, French infantry formed in squares repulsed Coalition cavalry for the first time during the war. On the same day, Clerfayt attacked Kortrijk (Courtrai) from the north but made little progress. On 11–12 May, French forces defeated Clerfayt and forced his troops to retreat. Finding himself badly outnumbered by the French, York withdrew within the defenses of Tournai and called for reinforcements. As a result of the battle, the French Army of the North maintained the grip on Courtrai and Menen (Menin) which it had won in late April. The fighting occurred during the War of the First Coalition near Kortrijk, Belgium, located about 85 kilometres (53 mi) west of Brussels.
| Battle of Courtrai (1794) | |||||||
|---|---|---|---|---|---|---|---|
| Part of the War of the First Coalition | |||||||
 The modern village of Willems | |||||||
| |||||||
| Belligerents | |||||||
.svg.png.webp) Republican France Republican France |
.svg.png.webp) Habsburg Austria Habsburg Austria.svg.png.webp) Great Britain Great Britain.svg.png.webp) Hanover Hanover Hesse-Darmstadt Hesse-Darmstadt | ||||||
| Commanders and leaders | |||||||
|
Charles Pichegru |
Count of Clerfayt Duke of York | ||||||
| Strength | |||||||
| 60,000 | 40,000 | ||||||
| Casualties and losses | |||||||
|
Willems: 2,400, 13 guns Courtrai: 1,000 |
Willems: 325 Courtrai: 1,500 | ||||||
Background
Plans
For the spring 1794 campaign, Lazare Carnot of the Committee of Public Safety devised a strategy in which the French Republican armies attacked the flanks of the Coalition forces in the Austrian Netherlands. On the western flank, 100,000 troops were ordered to strike first at Ypres, then Ghent, and finally Brussels. On the eastern flank, 100,000 soldiers would thrust toward Liège and Namur in order to cut off Austrian communications with Luxembourg City. Meanwhile, 50,000 men held the center of the French line near Bouchain and Maubeuge. The defect of this double envelopment strategy was that the Allies might throw the main weight of their forces on either French wing and crush it.[1]
Charles Pichegru, the new French commander, assumed command of the Army of the North on 8 February 1794. Pichegru was formerly the commander of the Army of the Rhine which had won the battles of Haguenau and Wissembourg, and relieved Landau.[2] In March 1794, the Army of the North numbered 194,930 men, of which 126,035 were available for the field. Counting the 32,773 soldiers of the subordinate Army of the Ardennes, Pichegru controlled 227,703 troops.[3] In mid-April 1794, the Army of the North units in western Flanders were, from left to right: Pierre Antoine Michaud's division (13,943) at Dunkirk, Jean Victor Marie Moreau's division (15,968) at Cassel, Joseph Souham's (31,856) division at Lille, and Pierre-Jacques Osten's brigade (7,822) at Pont-à-Marcq.[4]
At the beginning of April 1794, the Coalition forces under the overall command of Prince Josias of Saxe-Coburg-Saalfeld were deployed as follows. With headquarters at Tournai, Clerfayt commanded a field army of 24,000 Austrians, Hanoverians, and Hessians on the Allied right wing. Clerfayt was charged with defending Menin, Ypres, Nieuport, Orchies, and Marchiennes. Ludwig von Wurmb and 5,000 troops held Denain between the right wing and center. The Duke of York and 22,000 troops formed the right-center with headquarters at Saint-Amand-les-Eaux. Coburg and 43,000 men held the Allied center with headquarters at Valenciennes. William V, Prince of Orange and 19,000 Dutch soldiers made up the left-center, with headquarters at Bavay. The left wing under Franz Wenzel, Graf von Kaunitz-Rietberg counted 27,000 Austrian and Dutch troops and covered the ground between Bettignies (near Maubeuge) and Dinant.[5] Under the eyes of Francis II, Holy Roman Emperor, Coburg's main Coalition army advanced on 17 April and invested the fortress of Landrecies.[6] The Siege of Landrecies began on 21 April and ended on 30 April with a French surrender.[7]
Mouscron
On 26 April, Allied cavalry smashed a 20,000-man French column that intended to relieve Landrecies, inflicting 7,000 casualties and capturing its commander René-Bernard Chapuy along with Pichegru's plans for overrunning coastal Flanders.[8] Meanwhile, the French harassed Wurmb's troops at Denain, compelling Clerfayt to send 8,000 from his right wing to their aid. On 24 April, Michaud's 12,000-man division advanced toward Nieuport and Ypres, Moreau's 21,000-strong division surrounded Menin, and Souham's 30,000-man division moved toward Courtrai, which it captured. With Pichegru's plans in his hands, Coburg sent a reinforcement of 12 infantry battalions and 10 cavalry squadrons under Sir William Erskine to the right wing and ordered Clerfayt's 8,000 men from Denain back to Tournai. It was too late; Souham defeated the badly-outnumbered Clerfayt in the Battle of Mouscron on 29 April, inflicting 2,000 casualties and capturing 23 guns. The following night, the Coalition garrison abandoned Menin. In the Allied rear areas there was a panicky retreat of supply trains headed for Ghent and Brussels.[9]
.JPG.webp)
As soon as Landrecies fell, Coburg sent York with the remainder of his corps to Tournai. Heavy rains slowed York's column so that it was 3 May before it rejoined Erskine's force at Tournai. York sent a detachment west to Marquain and Lamain to relieve 5,000 of Clerfayt's soldiers who were guarding those places. Near Tournai, York's corps numbered 18,000, Clerfayt's corps counted 19,000, and Johann Ludwig, Reichsgraf von Wallmoden-Gimborn's division had 4,000–6,000 men at Warcoing. Included in Clerfayt's total was a new British brigade under Richard Whyte (12th Foot, 38th Foot, 55th Foot, and 8th Light Dragoons) that was marching from Ostend and had not yet joined.[10] On 5 May, the Allied corps commanders worked out a plan where Clerfayt would cross the Lys River downstream from Courtrai and attack Courtrai from the north. At the same time, York would advance west from Tournai in order to cut off Courtrai from the French base at Lille. However, Clerfayt balked and would not budge until he got direct orders from Imperial headquarters.[11]
York believed that French forces in the area numbered 24,000.[12] In fact, Pichegru deployed 40,000–50,000 soldiers between Menin and Courtrai.[11] Also, Pichegru ordered the 20,000-man division of Jacques Philippe Bonnaud (Chapuy's former command) to move from Cambrai to Sainghin-en-Mélantois, covering Lille.[13] Meanwhile, Coburg sent the divisions of Franz Joseph, Count Kinsky and Archduke Charles, Duke of Teschen east toward Tournai. Other divisions under Maximilian Baillet de Latour, József Alvinczi, and Franz von Werneck went east to support Kaunitz's left wing. Coburg ordered Clerfayt to leave Tournai and attack Courtrai. Accordingly, Clerfayt set out on 8 May and crossed to the north bank of the Lys at Harelbeke. At the same time, Souham lunged toward Dottignies, but missed Clerfayt and returned to his camp at Aalbeke.[14]
Battle
Willems
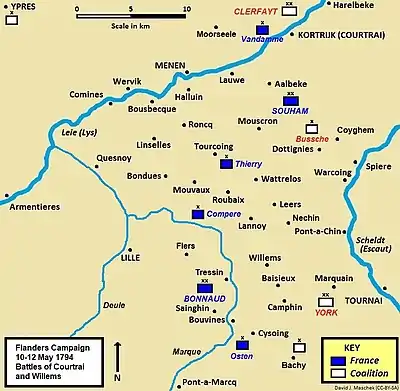
Souham's large division was on the south bank of the Lys and included the brigades of Étienne Macdonald, Herman Willem Daendels, Jan Willem de Winter, Henri-Antoine Jardon, and Philippe Joseph Malbrancq. There were two independent brigades: Louis Fursy Henri Compère's was near Lannoy and Jean François Thierry's was at Tourcoing.[12] Bonnaud's division included the brigades of Jean-Baptiste Salme, Nicolas Pierquin, and Pierre Nöel, and cavalry under Antoine-Raymond Baillot-Faral. Bonnaud controlled 23,000 troops including 6,000 men from Osten's brigade.[15] Historian John Fortescue noted that French brigades at this time had the strength of divisions.[16]
On 10 May 1794, Pichegru launched a major attack which crossed the Marque River soon after first light.[17] On the right flank, Osten's brigade marched from Pont-à-Marcq to Bouvines and then moved southeast through Cysoing. At Bachy, Osten's troops encountered the Austrian Kaunitz Infantry Regiment Nr. 20.[15] These two battalions, supported by three cavalry squadrons blocked Osten's progress and prevented York's left flank from being turned.[11] To the north, Compère moved into Lannoy while Thierry's brigade advanced toward Leers and Néchin and pushed back Coalition outposts. One source stated that Souham's division attacked Georg Wilhelm von dem Bussche's Hanoverian troops at Dottinges and Kooigem (Coyghem).[15] A second source asserted that Souham's division, including Macdonald's brigade, attacked Bussche near Mouscron and caused the Hanoverians to pull back.[13]
Bonnaud's division crossed the Marque at Pont-à-Tressin. The 15 battalions in the brigades of Pierquin and Nöel occupied Gruson, while Salme's brigade advanced on their left.[15] The French drove the British light troops out of Baisieux after a stubborn defense and occupied Camphin-en-Pévèle as well.[17] Bonnaud formed a 25-gun grand battery on a ridge west of Baisieux and Camphain and began a prolonged bombardment of the Coalition positions. After a three hour action, some Austrian grenadiers were forced back, but the French attack paused with its right flank in the air between Camphain and Wannehain to its south.[15]
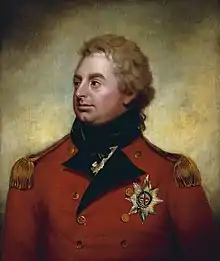
Seeing that there was a gap between Osten's troops and Bonnaud's right flank, York determined to send 16 cavalry squadrons into the low ground south of Lamain and gain a position to attack.[11] The cavalry force was led by William Harcourt and consisted of two squadrons each of the British 1st, 2nd, and 6th Dragoon Guards, the 7th, 11th, 15th, and 16th Light Dragoons, and the Austrian Erzherzog Leopold Hussar Regiment. Maximilian, Count of Merveldt, York's Austrian liaison officer, knew the ground and guided the cavalry into position.[15] A different source named the 2nd, 3rd, and 6th Dragoon Guards as present.[18] Though the ground was level and unenclosed, the local rapeseed crop was grown in furrows, which made it awkward for the Allied horsemen to charge. Seeing the cavalry approach, the French infantry formed squares.[19]
The Allied cavalry charged nine separate times, but failed to break into the squares. The speed of the charges was too slow and the French infantry stood firm.[19] The 6th Dragoon Guards charged a French square positioned behind a field of rapeseed. The furrows felled many horses and this regiment alone lost 31 men killed, wounded, and missing, plus 95 horses killed. To break the stalemate, York sent forward Henry Edward Fox's British infantry brigade[20] (14th Foot, 37th Foot, and 53rd Foot).[21] With its southern flank turned, Bonnaud's division began retreating from Camphin toward the north, covered by the French cavalry. As the Coalition cavalry followed, it was fired upon by the French grand battery. At this time, six more British squadrons reinforced the mass of Allied cavalry.[19] These regiments were the 1st, 2nd, and 6th Dragoons.[20][note 1]
The Coalition cavalry charged the French cavalry on both flanks and routed it. However, they were still unable to break the French infantry. Finally, a short distance to the south of Willems, some battalion guns from the British infantry caught up with the cavalry. After the battalion guns opened fire on the squares, the French infantry began to appear unsteady. An officer of the 2nd Dragoons (Scots Greys) rode his horse into a French square, knocked down three men, and turning his steed, knocked down six more. His troopers rode into the gap created and broke up the square. The sight of a square being broken dismayed the French, and the Allied cavalry broke up two more squares, inflicting heavy losses on the hapless French foot soldiers. Soon after, a large force of French cavalry appeared to the west. When charged by the 6th Dragoon Guards, the French horsemen scattered. One authority stated that the French suffered 2,000 casualties plus 450 men and 13 guns captured. British losses were 31 killed and 84 wounded.[22] Another authority wrote that in the cavalry action the French lost 1,000–2,000 casualties and 400 men and 13 guns captured. British cavalry losses were 30 men killed, 6 officers and 77 men wounded, 90 horses killed, and 140 horses wounded or missing.[19] In the fighting near Baisieux, Allied losses were 245 killed and wounded, and 80 missing. It is not clear if these figures included the British cavalry losses.[18] The French only admitted losing 500 men and 5 guns.[23]
Souham drove the Hanoverians from Dottinges and Spiere and they retreated to Warcoing. When the French found that Bonnaud's attack failed, Compère withdrew and Thierry stopped at Leers. By the day's end, the French pulled back to their original positions. The Royal Horse Guards (Blues) were also present because 11 British cavalry regiments were awarded the battle honor "Willems".[24] This battle marked the first time during the war that French infantry formed square and successfully fended off Allied cavalry.[18] York did not exploit his victory. Becoming aware of the very superior numbers of French troops in the area, he halted and called for reinforcements.[25]
Courtrai
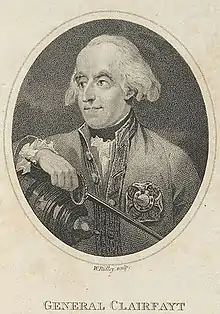
On 10 May, Clerfayt encountered a French brigade under Dominique Vandamme at Heule and drove it back to the outskirts of Courtrai.[14] Vandamme's brigade belonged to Moreau's division.[26] The Coalition troops forced their way into the suburb and might have seized Courtrai itself if Clerfayt had pressed the assault. Acting on Pichegru's orders, Souham turned his division back toward Courtrai.[13] On 11 May, Souham sent the brigades of Daendels and Winter to reinforce Vandamme at Courtrai.[14] Meanwhile, Souham ordered the brigades of Macdonald and Malbrancq to cross the Lys at Menin, and move northeast against Clerfayt.[13] The battle started at 3:00 pm and lasted until 10:00 pm. At first, Clerfayt's troops defended themselves stoutly, but by 6:00 pm Vandamme, Daendels, and Winter cleared their enemies from the Courtrai suburb. Soon after, Clerfayt unleashed a cavalry charge which dispersed Daendels' brigade.[14]
Clefayt ordered a withdrawal toward Tielt under cover of darkness. This separated Clerfayt from York and conceded defeat. Macdonald's brigade got as far as Moorsele but was unable to reach the battlefield until the fighting was done. According to one source, both sides sustained 1,200 casualties and the Austrians lost Lieutenant Field Marshal Franz Xaver von Wenckheim killed.[27] A second source stated that most of the fighting took place at Lendelede, 4 mi (6 km) north of Courtrai, and that Allied losses were 1,500 men and 2 guns.[25] A third source assigned 1,500 casualties to the Allies and 1,000 casualties to the French. Clerfayt's force included the following Hanoverian units: 3rd and 4th Grenadier battalions, and three squadrons of the 10th Light Dragoons. His Austrian troops consisted of 2 battalions each of Infantry Regiments Clerfayt Nr. 9 and Sztáray Nr. 33, the 3rd Battalion of Infantry Regiment Stuart Nr. 18, 8 squadrons of Latour Chevau-léger Regiment Nr. 31, and the Kaiser Dragoon Regiment Nr. 3, about 8,500 soldiers.[18]
On 12 May, there was a clash at Ingelmunster as the French pursued Clerfayt's retreating column. On the French side, Vandamme employed 8,000 infantry, 1,000 cavalry, and 15 12-pounder cannons. He was opposed by the following Hesse-Darmstadt troops led by General von Düring: Light Infantry Battalion, Leib-Grenadiers (2nd Battalion), Landgraf Infantry Regiment (1st Battalion), 4 squadrons of Chevau-légers, and 8 guns. The Austrian 2nd Battalion of Infantry Regiment Callenberg Nr. 54 and 2 guns were also engaged. The Hesse-Darmstadt troops lost 47 killed, 181 wounded, and 3 captured, plus 2 cannons. Austrian and French losses are not given.[28] Clerfayt was joined at Ingelmunster by Whyte's British brigade which helped discourage pursuit.[17]
Commentary
Historian Ramsay Weston Phipps wondered why the Allies split their forces before the battle and sent Clerfayt north to Courtrai while York remained near Tournai. He wrote that they might have "been kept together to strike one heavy blow in the rear of the two French divisions at Courtrai and Menin".[13] Fortescue called Clerfayt's 10 May attack on Courtrai "feeble". He criticized the British army's lack of horse artillery, which might have broken the French squares at Willems sooner and caused heavier losses. Fortescue wrote that the Austrian strategists failed to see that throwing their entire strength on one of the French wings might have crushed their enemies.[29] In the Battle of Tourcoing on 17–18 May 1794, the Coalition tried again without success to defeat the French.[30]
Notes
- Footnotes
- British cavalry included both Dragoon Guards and Dragoon regiments. Therefore, the 6th Dragoon Guards and the 6th Dragoons were different organizations.
- Citations
- Fortescue 2016, p. 86.
- Phipps 2011, pp. 275–276.
- Phipps 2011, p. 284.
- Phipps 2011, p. 292.
- Fortescue 2016, pp. 84–85.
- Fortescue 2016, pp. 90–92.
- Smith 1998, p. 76.
- Fortescue 2016, pp. 100–102.
- Fortescue 2016, pp. 102–104.
- Fortescue 2016, p. 105.
- Fortescue 2016, p. 106.
- Brown 2021, p. 131.
- Phipps 2011, p. 294.
- Cust 1859, p. 196.
- Brown 2021, p. 132.
- Fortescue 2016, p. 131.
- Cust 1859, p. 197.
- Smith 1998, p. 78.
- Fortescue 2016, p. 107.
- Brown 2021, p. 133.
- Fortescue 2016, p. 113.
- Brown 2021, p. 133–134.
- Phipps 2011, p. 295.
- Brown 2021, p. 134.
- Fortescue 2016, p. 108.
- Phipps 2011, p. 300.
- Cust 1859, pp. 196–197.
- Smith 1998, pp. 78–79.
- Fortescue 2016, pp. 106–108.
- Phipps 2011, p. 296.
References
- Cust, Edward (1859). "Annals of the Wars: 1783–1795". pp. 196–197. Retrieved 2 April 2021.
- Brown, Steve (2021). The Duke of York's Flanders Campaign: Fighting the French Revolution 1793-1795. Havertown, Pa.: Pen and Sword Books. ISBN 9781526742704. Retrieved May 19, 2021.
- Fortescue, John W. (2016). The Hard-Earned Lesson: The British Army & the Campaigns in Flanders & the Netherlands Against the French: 1792–99. Leonaur. ISBN 978-1-78282-500-5.
- Phipps, Ramsay Weston (2011). The Armies of the First French Republic: Volume I The Armée du Nord. USA: Pickle Partners Publishing. ISBN 978-1-908692-24-5.
- Smith, Digby (1998). The Napoleonic Wars Data Book. London: Greenhill. ISBN 1-85367-276-9.
Further reading
- Rickard, J. (2009). "Battle of Courtrai, 11 May 1794". historyofwar.org. Retrieved 3 August 2014.
- Rickard, J. (2009). "Battle of Willems, 10 May 1794". historyofwar.org. Retrieved 3 August 2014.
- Tucker, Spencer C. (2009-12-23). A Global Chronology of Conflict: From the Ancient World to the Modern Middle East [6 volumes]: From the Ancient World to the Modern Middle East. ABC-CLIO. p. 978. ISBN 978-1-85109-672-5.